Saturday, September 29, 2012

week 5

My shiny pretty crook after laquering

My very dented mouthpiece shank

Another angle of my dented mouthpiece shank

 After using a mandrel to get the worst of the dents out (a cone shaped thing I put in the bench motor (not turning it on) and tapping lightly on the mouthpiece)

I was not really pleased with my results so I put the mouthpiece in a receiver (brass thing on this picture), put a dent ball on a mount, and tapped lightly on it.
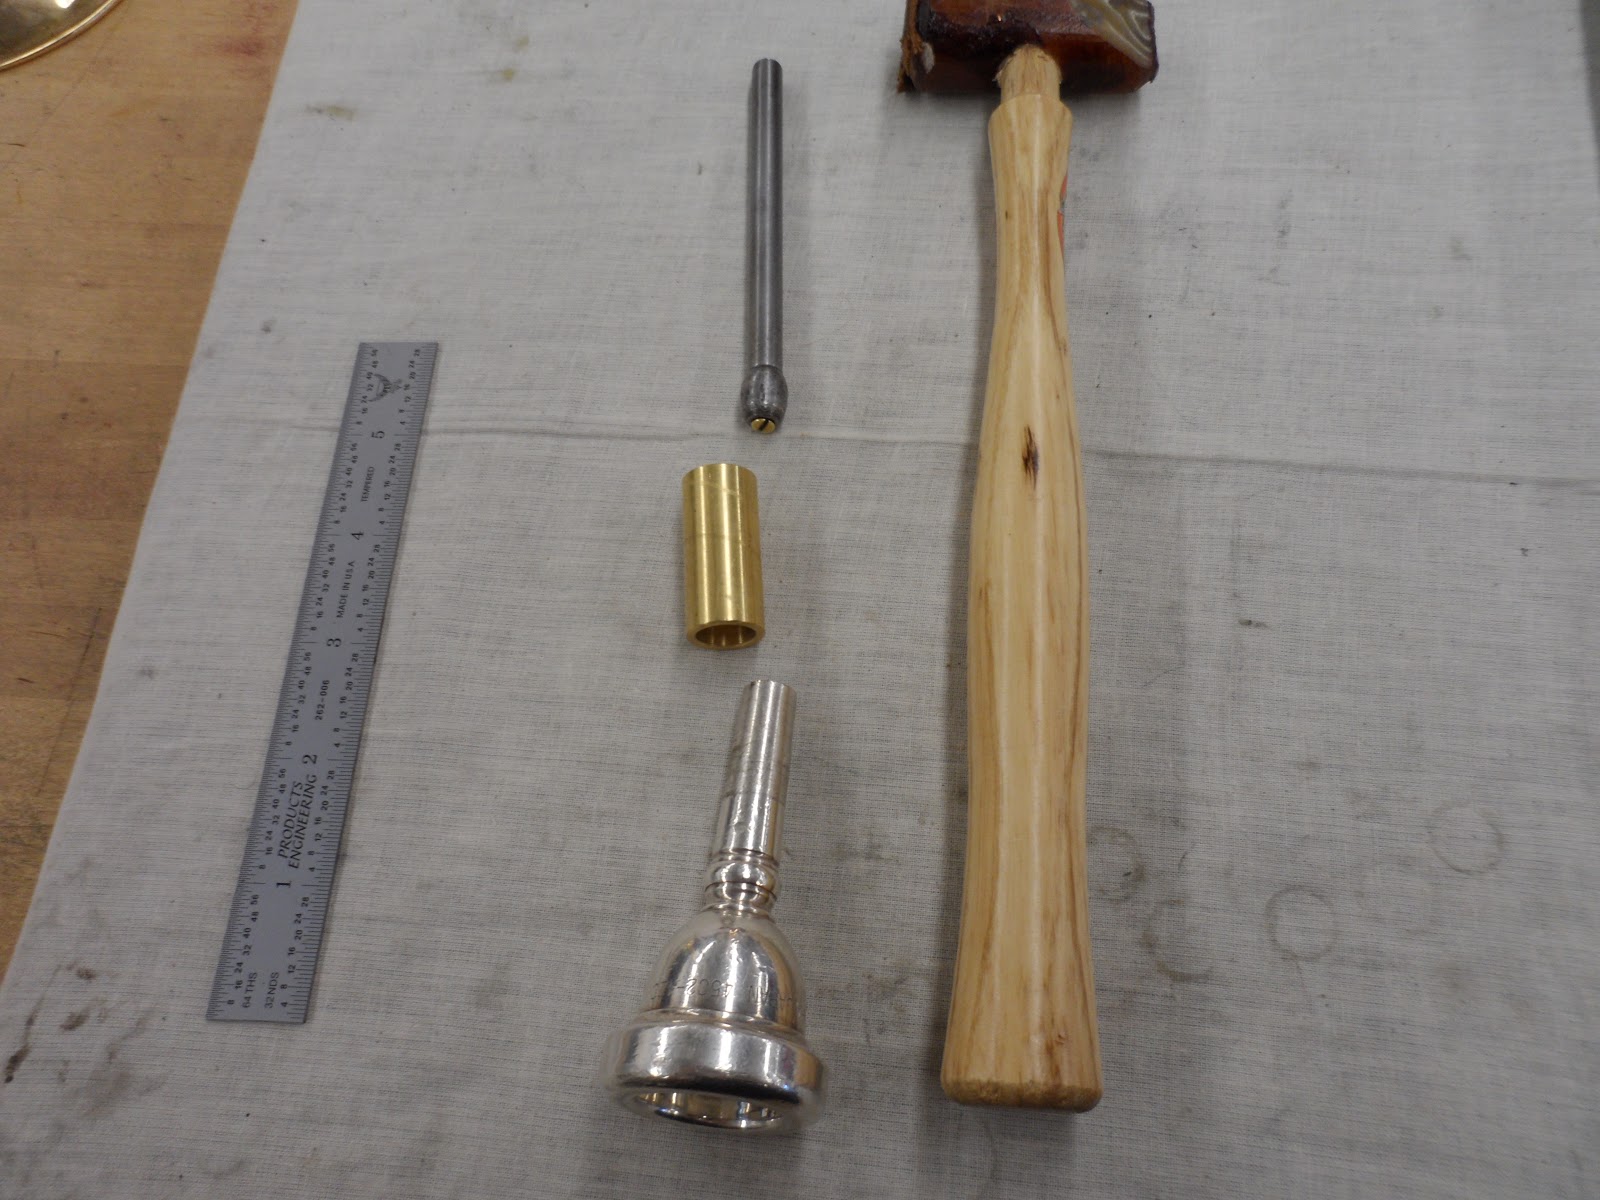
The receiver

My mouthpiece shank after using the dent ball, now I'm happy!

I had to make my burnisher really smooth, take out any scratches and mirror-polish it before I can take out the rim scratches (thanks Greg for rubbing my mouthpiece on a brick)

 My mouthpiece before I made it smoother with my burnisher (I put it in receiver and then into a mini lathe (didn't fit into my bench motor) and pressed it down with my burnisher)

My mouthpiece after smoothing it out. Only the deep dents are left, but now it can be used to play without hurting players.

That's my dent rod, after I used a sander to take away (about) half of the ball. We have to do this so we can get into tight areas and use the rim to rub out dents. We had to buff it to make it smooth and shiny.

The other end of my dent rod, buffed and nice.

This little thing started out as a tube with a hole in it. I made a bevel on one side and made the hole bigger on the other side.

This will hold draw/pull knobs in their rightful place when soldering.

That's my dent ball mount. It doesn't look impressive, but we had to measure the threads on the screw, and make the rod be able to accept that screw. This was done on a mini lathe.

I have to take the mouthpipe off this trumpet because it has really bad red rot.

The trumpet I got is really pretty, the bell says "Artist" and the mouthpiece receiver says "Western Germany".

After taking the mouthpipe assembly apart, except I have to take the receiver and the outer tube on the other end.

 This is the mouthpipe completely taken apart. Taking off the receiver was hard but with help from my classmate Billy Turner I was able to get it off.

Saturday, September 22, 2012

week 4

 That's my test patch.

The  hallway of my school, where my program has classrooms. Just a part of the wall.

Forgot to take a picture of the dent, so there is nothing to see because I took the dent out.

The red marks where I had dents.

A crook. I have to assemble it, soft solder it, and buff the crook.

 That's my test patch after buffing. We have to put valve oil on our cloth so the cloth won't scratch out buffed parts. That's how easy it is to get a scratch.

My dent rod. I filed the ends down so the balls would fit.

My dent rod with a ball on it.

My test patch after buffing with coloured compound. It makes it have a more glossy finish and takes out the fine scratches.

My dent rod after I bent one end.

My dent rod with it's balls before I silver soldered it.

The dent rod after I bent it.

My trumpet bell after Greg "accidentally" dropped it on the floor so I could take out a dent.

Saturday, September 15, 2012

week 3

We annealed a flat stick of brass, cut it up and let it lay in muriatic acid for about 20 minutes. We're going to put those patches on our practice trumpet bell.

Next I had to hammer my patches flat to make them ready to fit my trumpet bell.

That's the first solder job. Soft solder all over the place.

Greg made me take them off to do it again (and I learned a lot in that process)

When I was buffering my solder away to make it ready for new patches, the bell flew out of my hands. It ripped my rod off and I got a small dent in my bell. I was holding the bell wrong, and too low on the wheel.

This time I did a better job at putting those patches (new ones) on the bell. Off to buffer that extra solder!

Finished buffering the solder off, it's starting to get shiny.

Shiny! The difference between where I buffered and where I did not is obvious.

The bell is now shiny and pretty (buffered it with the red compound, which makes it shinier than the yellow one that I used for the first round).

Those round rods are flattened on the ends to see if tone holes (on flutes, clarinets...) are even.
We used a chuck to spin it, and came in with a toolbit, to make it absolutely perfect. This is the before picture.

This is when I had finished facing my big one, look how smooth and flat that thing is!
We have to keep those wrapped up in paper in order not to scratch them.

Saturday, September 8, 2012

week 2

That's my roommate Kyra, with her trumpet. She put notes on it so she would learn the name of the parts.

 That's my porting tool. We added the sliders so we could actually measure something.

 That is a spring installer. It's just a bent brass tube but I'm still happy with it.

That's the trumpet (and trombone) bells I got. I think we're going to buff them next week, can't wait!

First week

 My school :D
Minnesota State College Southeast Technical!

 My roommate and I on our first day of school
 My roommate on the big rock that the bus stops at
 Half of the class, brass part of it.

The ceiling of the brass room

My pokers. Got full score for the smaller one (the bigger one wasn't graded)

The method trumpet I got.

Porting measuring tool. 

 My rawhide hammer after I attached some leather to make the ends softer. I trimmed it after this picture was taken.